【Flutter&Dart Tips#3】Set/Mapを好きなWidget/クラスに変換する一番簡単な方法

皆様こんにちは! セカンドステップ代表のマサトです。
今回は任意のセット(Set<E>)、マップ(Map<K, V>)を任意のウィジェット(List<Widget>)に変換する方法について解説します。
前回はこちら
前回はList<E>を任意のウィジェット(List<Widget>)や任意のリスト(List<T>)に変換する方法について解説しました。
まだご覧になっていない方は、こちらからどうぞ↓↓↓
いきなり結論
今回もIterableのmapメソッドを使用します。
//セットはリストと同様にmapで加工できる
//【セット】.map((e) => 【eを使ってウィジェット/クラスを作成】)).toList()
set.map((e) => Text(e.toString())).toList()

//マップのkeysのみをリストとして取り出し、mapで加工する
//【マップ】.keys.map((e) => 【eを使ってウィジェット/クラスを作成】)).toList()
map.keys.map((e) => Text(e.toString())).toList()

//マップのvaluesのみをリストとして取り出し、mapで加工する
//【マップ】.values.map((e) => 【eを使ってウィジェット/クラスを作成】)).toList()
map.values.map((e) => Text(e.toString())).toList()

//マップのkeys,valuesの両方をリストとして取り出し、mapで加工する
//【マップ】.entries.map((e) => 【eを使ってウィジェット/クラスを作成】)).toList()
map.entries.map((e) => Text(e.toString())).toList()
Iterable<T> map<T>(T toElement(E e)) の詳細は以下をご覧ください。
各要素に対して引数toElementで指定したFunctionを実行して、その実行結果TをIterableとして返却します。
Functionは元となるList<E>の一つ一つをeに取り出すので、それを好きなクラスに変換します。例えば、eを文字列変換してTextウィジェットを作成したければ(e) => Text(e.toString())と書きます。
あとは出来あがったIterable<T>をList<T>に変換するために、.toList()を呼び出すだけでOKです。
コード
以下のサンプルコードをご覧ください。
import 'package:flutter/material.dart';
void main() {
runApp(const MaterialApp(home: MyApp()));
}
class MyApp extends StatelessWidget {
const MyApp({Key? key}) : super(key: key);
@override
Widget build(BuildContext context) {
//読み込み画像リスト
var imageUrlList = <String>[
//当サイト「セカンドステップ」の西園寺 悠樹先生
"https://2nd-step.net/wp-content/uploads/2020/07/a02a-e1618712054528.png",
//当サイト「セカンドステップ」の姫野 涼羽
"https://2nd-step.net/wp-content/uploads/2020/07/b01a.png",
];
//読み込み画像と背景色のマップ
var imageUrlMap = <String, Color>{
//当サイト「セカンドステップ」の西園寺 悠樹先生
"https://2nd-step.net/wp-content/uploads/2020/07/a02a-e1618712054528.png":
Color.fromARGB(255, 128, 200, 255),
//当サイト「セカンドステップ」の姫野 涼羽
"https://2nd-step.net/wp-content/uploads/2020/07/b01a.png":
Color.fromARGB(255, 255, 200, 255),
};
//アイコンセット
var set = <Icon>{
const Icon(Icons.abc),
const Icon(Icons.people_outline),
const Icon(Icons.photo),
const Icon(Icons.music_note),
const Icon(Icons.movie),
};
//文字列マップ
var map = <String, String>{
"aaa": "AAA",
"bbb": "BBB",
"ccc": "CCC",
};
//前回の復習
//Iterable.mapを使用してImageを読み込み
var imageCards = Row(
children: imageUrlList
.map((e) => Card(
child: Image.network(e, height: 200),
))
.toList());
//Map.entriesに対するmapを使用してImageと背景色のColorを読み込み
var imageCardsWithColors = Row(
children: imageUrlMap.entries
.map((e) => Card(
child: Image.network(e.key, height: 200),
color: e.value,
))
.toList());
//SetもListもIterableのサブクラスなので、mapがそのまま使える
var iconsSet = Row(
children: set
.map((e) => Card(child: e, color: Colors.purpleAccent))
.toList());
//mapのkey(左辺)だけを使いたい場合はkeysを使う
var textKeys = Row(
children: map.keys
.map((e) => _buildCard(color: Colors.amber, text: e))
.toList());
//mapのvalue(右辺)だけを使いたい場合はvaluesを使う
var textValues = Row(
children: map.values
.map((e) => _buildCard(color: Colors.green, text: e))
.toList());
//mapのkeyとvalueを両方使いたい場合はentriesを使う
var textKeyValues = Column(
children: map.entries
.map((e) => Row(
children: [
_buildCard(color: Colors.amber, text: e.key),
_buildCard(color: Colors.green, text: e.value),
],
))
.toList());
return Scaffold(
body: SafeArea(
child: Center(
child: Column(
children: [
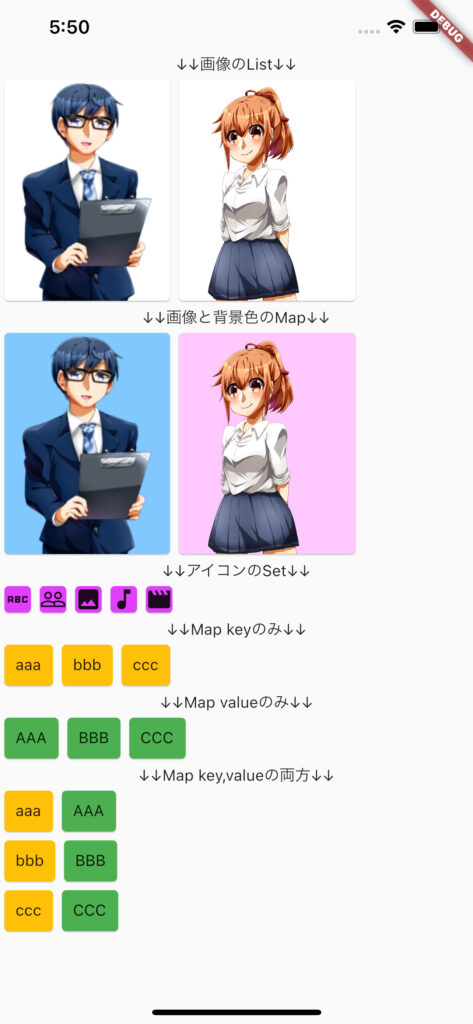
const Text("↓↓画像のList↓↓"),
imageCards,
const Text("↓↓画像と背景色のMap↓↓"),
imageCardsWithColors,
const Text("↓↓アイコンのSet↓↓"),
iconsSet,
const Text("↓↓Map keyのみ↓↓"),
textKeys,
const Text("↓↓Map valueのみ↓↓"),
textValues,
const Text("↓↓Map key,valueの両方↓↓"),
textKeyValues,
],
))));
}
Card _buildCard({required Color color, required String text}) {
return Card(
color: color,
child: Padding(
padding: const EdgeInsets.all(10),
child: Text(text),
));
}
}
動作確認(CodePen)※画像は読み込みできません
右上の「EDIT ON CODEPEN」でフルスクリーンに拡大できます!
import 'package:flutter/material.dart';

void main() {
  runApp(const MaterialApp(home: MyApp()));
}

class MyApp extends StatelessWidget {
  const MyApp({Key? key}) : super(key: key);

  @override
  Widget build(BuildContext context) {
    //読み込み画像リスト
    var imageUrlList = <String>[
      //当サイト「セカンドステップ」の西園寺 悠樹先生
      "https://2nd-step.net/wp-content/uploads/2020/07/a02a-e1618712054528.png",
      //当サイト「セカンドステップ」の姫野 涼羽
      "https://2nd-step.net/wp-content/uploads/2020/07/b01a.png",
    ];

    //読み込み画像と背景色のマップ
    var imageUrlMap = <String, Color>{
      //当サイト「セカンドステップ」の西園寺 悠樹先生
      "https://2nd-step.net/wp-content/uploads/2020/07/a02a-e1618712054528.png":
          Color.fromARGB(255, 128, 200, 255),
      //当サイト「セカンドステップ」の姫野 涼羽
      "https://2nd-step.net/wp-content/uploads/2020/07/b01a.png":
          Color.fromARGB(255, 255, 200, 255),
    };

    //アイコンセット
    var set = <Icon>{
      const Icon(Icons.abc),
      const Icon(Icons.people_outline),
      const Icon(Icons.photo),
      const Icon(Icons.music_note),
      const Icon(Icons.movie),
    };

    //文字列マップ
    var map = <String, String>{
      "aaa": "AAA",
      "bbb": "BBB",
      "ccc": "CCC",
    };

    //前回の復習
    //Iterable.mapを使用してImageを読み込み
    var imageCards = Row(
        children: imageUrlList
            .map((e) => Card(
                  child: Image.network(e, height: 200),
                ))
            .toList());

    //Map.entriesに対するmapを使用してImageと背景色のColorを読み込み
    var imageCardsWithColors = Row(
        children: imageUrlMap.entries
            .map((e) => Card(
                  child: Image.network(e.key, height: 200),
                  color: e.value,
                ))
            .toList());

    //SetもListもIterableのサブクラスなので、mapがそのまま使える
    var iconsSet = Row(
        children: set
            .map((e) => Card(child: e, color: Colors.purpleAccent))
            .toList());

    //mapのkey(左辺)だけを使いたい場合はkeysを使う
    var textKeys = Row(
        children: map.keys
            .map((e) => _buildCard(color: Colors.amber, text: e))
            .toList());

    //mapのvalue(右辺)だけを使いたい場合はvaluesを使う
    var textValues = Row(
        children: map.values
            .map((e) => _buildCard(color: Colors.green, text: e))
            .toList());

    //mapのkeyとvalueを両方使いたい場合はentriesを使う
    var textKeyValues = Column(
        children: map.entries
            .map((e) => Row(
                  children: [
                    _buildCard(color: Colors.amber, text: e.key),
                    _buildCard(color: Colors.green, text: e.value),
                  ],
                ))
            .toList());

    return Scaffold(
        body: SafeArea(
            child: SingleChildScrollView(
                child: Column(
      children: [
        const Text("↓↓画像のList↓↓"),
        imageCards,
        const Text("↓↓画像と背景色のMap↓↓"),
        imageCardsWithColors,
        const Text("↓↓アイコンのSet↓↓"),
        iconsSet,
        const Text("↓↓Map keyのみ↓↓"),
        textKeys,
        const Text("↓↓Map valueのみ↓↓"),
        textValues,
        const Text("↓↓Map key,valueの両方↓↓"),
        textKeyValues,
      ],
    ))));
  }

  Card _buildCard({required Color color, required String text}) {
    return Card(
        color: color,
        child: Padding(
          padding: const EdgeInsets.all(10),
          child: Text(text),
        ));
  }
}
動作確認(DartPad)※画像は読み込みできません
色々改造して実験してみてください! コツが掴めると非常に便利な機能です。
ご感想・ご要望など、コメントをしていただけると励みになります! ここまでお読みくださりありがとうございました!
GitHub Gistにも同じコードを掲載しておりますので、お好きな方をご使用下さい。